
Tag: Best Digital Marekting Institute in Kanpur

  • How to Create a Social Media Post in Canva?

    How to Create a Social Media Post in Canva?

    You Don’t Need to Be a Designer to Make This Work

    If you have ever looked at someone’s Instagram post and thought, “How did they make that look so good?” the answer is almost always Canva. Canva is a free online design tool that anyone can use. You don’t need Photoshop skills. You don’t need a design degree. You just need a browser, a few minutes, and this guide.

    In the next 8 minutes, I’ll walk you through every single step from opening Canva to downloading your finished post, ready to share.

    What you’ll be able to do after reading this:  Create a social media post in Canva from scratch.
    Customise templates with your own text, colours, and images. Download a high-quality file ready to post on any platform

    What Is Canva, and Why Do People Love It?

    Canva is a web-based design tool launched in 2013. Today, it has over 170 million users worldwide, and honestly, once you try it, it’s easy to see why.

    Everything works by dragging and dropping. You pick a template, click on things to edit them, and when you’re done, you download. That’s it. There’s no complicated software to install, and the free plan gives you access to thousands of templates, photos, and icons right away. It works on any device: your laptop, your phone, your tablet. You just need an internet connection.
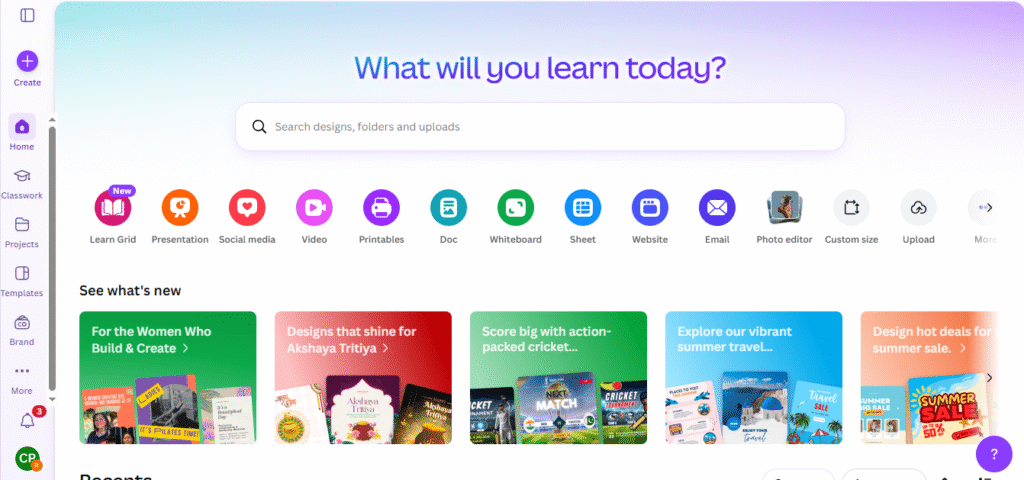
    Canva sign up page create account step

    Steps to Create Social Media Post in Canva

    “Learning how to create social media posts in Canva is one of the easiest ways to design like a pro.”Let’s go through the whole process together. I’ll keep each step short and simple. Create a Free Canva account.

    1. Create a free account on Canva

    Go to canva.com and click ‘Sign up’. You can register with your Google account, Facebook, or your email address. The free account gives you access to everything you need for this guide; no credit card required.

    Already have an account? Just click Log in and skip straight to the next step.

    2. Click ‘Create a Design’ and pick your size


    Once you’re inside Canva, look for the purple ‘+ Create a design’ button in the top-right corner. Click it and a dropdown menu will appear.

    You can either search for a size type ‘Instagram post’ or ‘Facebook post’ or scroll through the suggestions. Here are the sizes you’ll use most:

    Choose template Canva social media post
    • Instagram Post (Square): 1080 × 1080 px
    • Instagram Story or Reel: 1080 × 1920 px
    •   Facebook Post: 1200 × 630 px
    • Twitter / X Post: 1024 × 512 px   
    • LinkedIn Post: 1200 × 627 px
       
    Pro Tip:  Always start with the correct size. If you design at the wrong dimensions and try to resize later, your text and images will shift around, and you’ll have to fix everything.

    3.Choose a Template You Like

    When your blank canvas opens, the left panel will show the Templates section. This is where Canva really shines; there are thousands of free, professionally designed templates waiting for you.

    Use the search bar at the top to find something relevant. If you’re posting about a product sale, search ‘sale’. Running a fitness page? Try ‘gym’ or ‘workout’. You can also filter by colour, style, or theme.When you find one you like, just click it. It loads onto your canvas instantly. You can change absolutely everything about it colours, fonts, images, layout so don’t worry if it’s not perfect yet.

    Note:  Templates marked with a small crown icon are Canva Pro (paid). Plenty of excellent free templates are available — you don’t need to upgrade.

    4. Edit the tex

    Every template comes with placeholder text, things like ‘Your Headline Here’ or ‘Add your caption’. To change it, just double-click on any text on the canvas. A cursor will appear, and you can start typing.

    Once you’ve selected a text box, the toolbar along the top of the screen gives you full control:

    Add elements icons shapes in Canva
    • Font — click the font name to browse hundreds of options
    • Size — make headlines bigger, body text smaller. Bold, italic, underline, basic formatting you already know
    •  Color — click the colored square to change the text color

    Alignment — left, center, or right align your text. A few things that make a real difference with text: keep headlines short (five to seven words is ideal), use a font size that’s readable even on a small phone screen, and make sure your text colour has enough contrast against the background.

    5.Change the Colors to Match Your Style


    This is where a design starts to feel personal. Click on any element, the background, a shape, or a line, and you’ll see a coloured square appear in the toolbar at the top. Click it to open the colour picker.

    From there you can pick from Canva’s suggested palette, click the ‘+’, to browse the full colour spectrum, or type in a specific HEX code if you have brand colours. For example, typing #1DA1F2 gives you the exact shade of Twitter blue.

    Pro Tip: Not sure which colours go together? Canva’s palette suggestions are already colour-matched, so clicking any of them gives you a combination that works. You can’t really go wrong.


    6. Add Graphics, Icons, or Shapes

    Click Elements in the left panel. You’ll find thousands of free icons, shapes, lines, stickers, frames, and illustrations. The easiest way to find what you want is to use the search bar type ‘arrow’, ‘star’, ‘coffee cup’, or whatever fits your design.Click any element to add it to your canvas, then drag it wherever you want. Grab the corner handles to resize it. You can also right-click an element to send it forward or backward if something is overlapping something else.

    Add elements icons shapes in Canva

    7. Upload Your Own Photo or Logo

    In the left panel, click Uploads, then click the ‘Upload files’ button. Select any image from your device a photo, your business logo, a product shot, whatever you need.

    Once it uploads, click it or drag it onto your canvas. Then resize and reposition it just like any other element.

    Pro Tip:  If you have a logo, upload it as a PNG file with a transparent background. This means there won’t be a white box around it; the logo will sit cleanly on any background colour or image.

    Upload images and logo in Canva

    8. Use Canva’s Free Stock Photos

    Don’t have your own photo? No problem. Go to Elements and click Photos, or click the search bar and look for something specific. Type ‘coffee shop’, ‘team meeting’, or ‘sunset’. Canva has millions of free stock photos you can use in your designs.

    Click a photo to add it to your canvas. You can drag the edges to resize it and double-click it to reposition what’s visible inside the frame (like zooming in or panning left and right).

    Use free stock photos in Canva

    9. Preview Before You Download

    When your design looks finished, click the eye icon in the top-right corner — this is the Preview button. It shows you exactly what the post will look like without all the editing handles and guides visible.

    Before you download, quickly check these four things:

    • Is all the text spelt correctly?
    • Is everything readable especially on a small screen?
    • Are there any elements that are accidentally cut off at the edge?
    • Does the overall design look balanced and clean?

    If something doesn’t look right, click anywhere to exit preview and go back to editing. Once you’re happy, you’re ready to download.

    10. Download Your Design

    Click the Share button in the top-right corner. In the dropdown, select Download. Canva will ask you what file format you want:

    • PNG — the best option for social media. High quality, small file size, no loss of     detail.
    • JPG — slightly smaller files, good for photo-heavy designs.
    • PDF — useful if you’re creating something to print, like a flyer or poster.

    For social media, always choose PNG. Click the green ‘Download’ button, and your file will save to your device. That’s it; your design is done and ready to post.

    Download Canva design high-quality PNG


    Pro Tip:  Want to skip the download step entirely? Canva lets you share your post directly to connected social accounts. Look for the ‘Share’ options after clicking the Share button.

    Quick Tips to Make Your Posts Stand Out

    • Once you’ve got the basics down, these small habits will noticeably improve every design you make:
    • Stick to two fonts maximum: one for headlines and one for body text. More than that gets messy.
    • Leave space in your design. Crowded posts are hard to read. White space is your friend.
    • Use the alignment guides. Canva shows pink guidelines when elements are perfectly centred or aligned; aim for those.

    Contrast is everything. Dark text on a dark background, or light text on a light background, doesn’t work. Make sure your text pops. Save your brand colours. If you use the same two or three colours repeatedly, save them in Canva’s colour palette so you can find them instantly every time.

    Top Tips for Better Canva Social Media Posts

       Stick to 2–3 fonts maximum to keep your design clean and professional

    •       Use Canva’s Brand Kit (free version available) to save your brand colors and fonts

    •       Add white space; don’t crowd your design with too many elements

    •       Use high-contrast text colors so your message is readable at a glance

    •       Always design at the correct size for each platform for the best display quality

    •       Use Canva’s built-in grid and alignment guides to keep elements perfectly straight

    You’re Ready — Go Make Something

    Once you know how to create social media posts in Canva, designing becomes fast and simple. Creating social media posts in Canva is one of those things that feels intimidating before you try it, and then completely natural once you do. The first design might take you twenty minutes. By your fifth, you’ll probably be done in under five.

    The key is to just start. Open Canva, pick a template that’s close to what you want, and work through the steps above one at a time. You don’t need everything to be perfect; you just need to begin.

    If this guide helped you, feel free to bookmark it and come back when you need a refresher. And if you have a question that isn’t covered here, drop it in the comments. I’m happy to help.

    Related Posts You Might Find Helpful:→  How to Make an Instagram Story in Canva (Step-by-Step)→  10 Free Canva Templates for Small Businesses→  How to Create a Logo in Canva for Free→  Canva vs Adobe Express: Which Is Better for Beginners?

    Frequently Asked Questions (FAQ)

    Below are the most commonly searched questions about creating social media posts in Canva.

    Q: Is Canva free to use for social media posts?

    A: Yes! Canva’s free plan includes thousands of templates, stock photos, elements, and fonts – everything you need to create professional social media posts at no cost. Canva Pro adds extra features like more templates, a background remover, and brand kits but is not required.

    Q: What is the best size for a Canva Instagram post?

    A: The best size for an Instagram post (square) is 1080 × 1080 pixels. For Instagram Stories and Reels, use 1080 × 1920 pixels. Canva has these preset sizes built in just search for ‘Instagram Post’ in the Create a Design menu.

    Q: Can I use Canva on my mobile phone?

    A: Yes! Canva has a free mobile app for both Android and iOS. The app includes all the same features as the desktop version, making it easy to design social media posts directly from your phone.

    Q: How do I add my own logo to a Canva design?

    A: Click the Uploads tab in the left sidebar, then click ‘Upload files’ to add your logo from your device. For best results, upload a PNG file with a transparent background. Once uploaded, drag your logo onto the canvas and resize it as needed.

    Q: Can I download Canva designs without a watermark?

    A: Yes. All designs created on the free Canva plan can be downloaded without any watermark. Only Canva Pro premium elements (marked with a crown icon) require a paid subscription.

    Q: Can I schedule social media posts directly from Canva?

    A: Yes! Canva Pro users can schedule posts directly to Instagram, Facebook, Twitter, LinkedIn, and Pinterest from within the Canva editor. Free users can download their design and upload it manually to each platform.

  • Content Calendar: A Complete Beginner’s Guide for Digital Marketers (2026)

    Content Calendar: A Complete Beginner’s Guide for Digital Marketers (2026)

    Have you ever felt stressed because you don’t know what to post tomorrow? You are not alone. Most businesses and students in digital marketing face the same problem every week. The solution is simply a content calendar.

    In this guide, we will explain exactly what a content calendar is, why it matters for your brand, and how you can create one from scratch, even if you are a complete beginner. Whether you are learning digital marketing or running a business, this guide is for you.

    What is a content calendar?

    A content calendar is a planning tool that shows you what content to publish, when to publish it, and on which platform. Think of it as your monthly schedule, but instead of meetings, it has blog posts, Instagram reels, YouTube videos, and emails.

    It is also called an editorial calendar by many marketers. Big brands like Zomato, Nykaa, and Myntra all use a content calendar to stay consistent on social media and their websites.

    content calendar planning using a notebook and laptop for scheduling social media posts

    Why every marketer needs a content calendar

    Here is a real situation. Imagine a student who learned social media marketing but posts randomly, sometimes twice a week, sometimes nothing for 10 days. Their audience does not grow. Now imagine someone who plans 30 posts every month using a content calendar. Their engagement doubles within 60 days.
    That difference is not talent. It is planned.

    YV Tip: Brands that post consistently get 3x more engagement than those who post randomly. Consistency is the #1 secret in content marketing and a calendar gives you that consistency.

    Key benefits at a glance

    • Saves time — you plan once and execute all month without daily stress.
    • Keep your team aligned — everyone knows what is going live and when.
    • Helps with SEO — consistent blogging with planned keywords improves your Google ranking.
    • Reduces mistakes — you avoid posting the wrong thing on the wrong day (like a sales post on a national holiday).
    • Tracks performance—you can review what worked last month and improve the next one.

    How to create a content calendar in 5 steps

    • Choose your platforms—decide where you will post: Instagram, Facebook, LinkedIn, YouTube, or your blog. Do not try to be everywhere at once.
    • Decide your content types—list the formats you will use: reels, carousels, blog posts, stories, and emails. Mix them to keep your audience interested.
    • Pick your posting frequency—start small. Three posts a week on Instagram is better than seven posts for two weeks and then nothing.
    • Fill in the calendar—assign a topic to each date. Include the caption idea, hashtags, and the person responsible if you have a team.
    • Review and adjust every month—check which posts got the most reach. Do more of what works and cut what does not.

    What should your content calendar include?

    A good content calendar is not just a list of dates. Each row in your sheet should have these columns:

    • Date and day—When will this go live?
    • Platform — Instagram, LinkedIn, blog, email?
    • Content type—Reel, carousel, static post, article?
    • Topic or caption idea — A short description of what the post is about.
    • Status — Not started / In progress / Ready / Published.

    Link or media file — The final image or video attached to the row.

    team creating a content calendar strategy for social media and digital marketing campaigns

    Pro tip from YV: Colour-code your calendar. Use green for published posts, yellow for in-progress, and red for delayed. This gives your whole month a visual overview in 5 seconds.

    Free tools to build your content calendar

    You do not need to spend money when you are starting. These free tools work very well for students and small businesses managing their content calendar:

    • Google Sheets — Simple, shareable, free. Best for beginners.
    • Notion — More visual, great for teams and freelancers.
    • Trello — Card-based, easy to drag and drop.
    • Meta Business Suite — Directly schedule Facebook and Instagram posts.
    • Buffer (free plan) — Schedule posts across multiple platforms.

    Common mistakes beginners make with a content calendar

    At YV Digital Marketing Institute, we have trained hundreds of students in content strategy. Here are the most common mistakes we see — and how to avoid them.

    • Planning too far ahead without flexibility—Leave 20% of your calendar empty for trending topics and last-minute ideas.
    • Only promotional content — Follow the 80/20 rule. 80% value-based content, 20% selling.
    • Ignoring platform differences — What works on LinkedIn does not always work on Instagram. Adapt your content for each platform.
    • Not reviewing performance—A calendar is only useful if you analyze results and improve each month.

    Bottom line

    Learn content strategy at YV Digital Marketing Institute. Want to master content calendars, social media strategy, and SEO together? Join our digital marketing course and learn from real industry projects, not just theory. Enroll today and take the first step toward a career in digital marketing.

    FAQs

    1. What is a content calendar in digital marketing?
    A content calendar is a simple planning tool used to schedule what content to post, when to post it, and where to publish it. It helps marketers stay consistent across platforms like blogs, Instagram, and YouTube while keeping content organized in advance.

    2. Why is a content calendar important?
    A content calendar is important because it keeps your posting consistent, saves time, and reduces last-minute stress. It also helps you plan better content strategies, align your team, and improve engagement by posting regularly instead of randomly.

    3. What should be included in a content calendar?
    A content calendar should include the posting date, platform, content type, topic or idea, status, and media link. These elements help you manage your workflow, track progress, and ensure every piece of content is planned and executed properly.

    4. Which tools can beginners use to create a content calendar?
    Beginners can create a content calendar using simple tools like Google Sheets for basic planning, Notion for organization, Trello for visual boards, Meta Business Suite for scheduling, and Buffer for managing posts across multiple platforms.

    5. How far in advance should I plan my content?
    You should plan your content at least 2 to 4 weeks in advance to stay consistent and reduce your daily workload. At the same time, keep some flexibility in your calendar to adjust for trending topics and last-minute content ideas.


  • Why Every Successful Digital Marketer Builds a Buyer Persona Before Doing Anything Else

    Why Every Successful Digital Marketer Builds a Buyer Persona Before Doing Anything Else

    Buyer persona in digital marketing is the first thing every smart marketer focuses on before creating content or running ads. Picture this: you spend hours designing a reel, writing a caption, running an ad. You hit publish. And crickets. No likes. No clicks. No leads.

    Sound familiar? The problem usually isn’t your content. It isn’t your budget either. The real problem is simpler and more common than you’d think: you don’t truly know who you’re talking to.

    That’s exactly why every successful digital marketer before writing a single word, designing a single post, or spending a single rupee on ads, builds something called a buyer persona.

    buyer persona in digital marketing concept illustration

    What is a Buyer Persona?

    A buyer persona is a detailed, semi-fictional profile of your ideal customer. It’s built from real data from your existing customers, market research, and social media analytics, combined with thoughtful assumptions about who is most likely to buy from you. A strong buyer persona in digital marketing gives direction to your content and marketing decisions from the start.

    “A buyer persona isn’t a real person it’s the most accurate picture of the real person you want to reach.”

    Think of it like writing a character for a story. You give them a name, an age, a job, a set of dreams, and a list of fears. Then, every time you create content or plan a campaign as a digital marketer, you ask: Would this speak to that person?

    If the answer is yes, you’re on the right track.

    Three Real-World Buyer Persona Examples

    Here’s what buyer personas look like for a digital marketing institute like YV Institute — three different people, three completely different marketing approaches:

    examples of buyer persona in digital marketing for students and professionals

    Same institute. Three completely different people. Now imagine running one generic ad for all three it speaks to none of them. But when a digital marketer creates three targeted messages one for each persona  suddenly every word lands exactly where it should. These examples clearly show how buyer persona in digital marketing changes your messaging for different audiences.

    Why Does a Buyer Persona Matter So Much?

    A buyer persona isn’t just a nice-to-have document. It’s the foundation that every part of your digital marketing strategy rests on. A clear buyer persona in digital marketing helps you understand what your audience actually wants

    • Better content

    Every blog, reel, and caption is written for a real person, not an empty room.

    • Sharper ad targeting

    You know the exact demographics, interests, and behaviors to target on Meta and Google Ads.

    • Higher conversions

    When people feel truly understood, they trust you  and trust is what drives sales.

    • Team alignment

    Everyone’s content, sales, and design stay on the same page about who you’re serving.

    How to Build Your Buyer Persona in 6 Steps

    When you build a buyer persona in digital marketing, your strategy becomes more focused and practical. This is the exact process every professional digital marketer follows and what we teach at YV Institute from day one:

    • Research your existing customers

      Who’s already buying from you or engaging with your content? Talk to them, check your analytics, read your DMs. Real data beats assumptions every time.
    • Collect demographic information

      Age, gender, location, education, job, income level. Tools like Google Analytics and Meta Audience Insights make this easy  even for beginners.
    • Understand their goals and pain points

      What do they want to achieve? What’s stopping them? Your product or service is the bridge between their current problem and their desired result.
    • Find out where they spend time online

      Instagram? LinkedIn? YouTube? WhatsApp groups? This tells you which platforms to focus on and what type of content format actually works for them.
    • Map their decision-making journey

      Do they research for weeks before buying? Do they need testimonials and reviews? Do they act on urgency? Understanding this shapes your entire sales funnel.
    • Give them a name and make them real

      Name your persona. Give them a face. When your team says “Would Riya share this?” instead of “Is this good content?” your marketing thinking completely shifts.
    steps to create buyer persona in digital marketing strategy

    Buyer Persona vs. Target Audience — Know the Difference

    This is one of the most common confusions in digital marketing. Here’s the clearest way to understand it:

    Your target audience is the broad group you’re speaking to. Your buyer persona is the specific individual within that group you’re designing everything for.

    Target Audience: “Women aged 20–35 in UP interested in online learning.”

    Buyer Persona: “Riya, 22, from Kanpur, recently graduated, worried about job competition, scrolls Instagram at night, and buys only after seeing real placement proof.” One is a filter. The other is a person. And great digital marketing always speaks to a person, never just a filter.

    3 Mistakes to Avoid When Building a Buyer Persona

    Being too vague

    “Anyone who wants to learn digital marketing” is not a persona. The more specific your buyer persona, the more powerful and focused your digital marketing strategy becomes. Specificity is a superpower.

    Ignoring negative personas

    A negative persona tells you who you are not targeting, for example, people who only want free resources and will never invest in a course. Knowing this saves you time, budget, and energy.

    Building it once and never updating

    Your audience evolves, your product evolves, the market evolves. Revisit your buyer persona at least once a year to make sure it still reflects reality.

    Conclusion

    Without a strong buyer persona in digital marketing, most campaigns fail to connect with the right people.The difference between a digital marketer who gets results and one who keeps guessing is not budget, not tools, and not talent. It’s clarity, specifically, clarity about who they’re marketing to. A well-built buyer persona gives you that clarity. It turns vague campaigns into conversations

    That feels personal. It turns strangers into followers, followers into leads, and leads into loyal customers. At YV Institute, we don’t just teach you how to run ads or post on social media; we teach you to think like a strategist. And building a buyer persona is always step one. In the end, success depends on how well you understand your audience, and that starts with building a clear buyer persona in digital marketing.

    Want to learn digital marketing the right way?

    Join YV Institute in Kanpur — where real strategy meets real practice. Placements included. Book a Free Demo Class

    FAQs

    1. What is a buyer persona in digital marketing?

    A buyer persona is a clear profile of your ideal customer based on real data and behavior. It helps you understand who you are targeting so your content, ads, and messaging connect with the right people.

    2. Why is a buyer persona important before starting marketing?

    Without knowing your audience, even good content may not perform well. A buyer persona gives direction to your strategy, so you create content that people actually relate to and respond to.

    3. How can beginners create a buyer persona?

    Beginners can start by observing their audience, checking social media insights, and understanding common goals and problems. Once you have this basic information, you can shape a simple persona and improve it over time.

  • Top Digital Marketing Mistakes That Are Killing Your Website Traffic

    Top Digital Marketing Mistakes That Are Killing Your Website Traffic


    Top digital marketing course in Kanpur is often searched by students who want real skills and better career opportunities. But before learning advanced strategies, it is important to understand the common digital marketing mistakes that silently reduce website traffic. A lot of people think that once a website is live, traffic will automatically start coming. But after a few months, they realise nothing is really happening. Visitors are low. Leads are inconsistent. Sales are almost zero.

    The truth is simple: most websites don’t fail because of lack of effort. They fail because of small but serious digital marketing mistakes.

    Let’s talk about the real ones

    1. No Clear Direction From the Beginning

    Many businesses start digital marketing because everyone else is doing it. They create a website, open social media accounts, and maybe even run ads.

    But they never decide:

    • Who exactly are we targeting?
    • What problem are we solving?
    • What action do we want visitors to take?

    Without clarity, marketing becomes random. Random content brings random visitors. And random visitors don’t convert.

    Before doing anything, there has to be a clear plan.

    SEO strategy example for top digital marketing course in Kanpur

    2. Treating SEO Like a Formality

    Some people either ignore SEO completely or just “add keywords” and think the work is done. SEO is not about stuffing keywords into paragraphs. It is about understanding what people are searching for and giving them the exact information they need.

    For example, if someone searches for the top digital marketing course in Kanpur, they are not just looking for a name. They want details on course modules, practical training, duration, fees, and career scope. If your page does not properly answer those questions, Google will not rank it for long. SEO requires structure, clarity, and useful information, not repetition.

    3. Writing Content Without Thinking About the Reader

    Many blogs sound perfect but feel empty. They use big words and long explanations and still don’t say anything meaningful.

    When someone visits your website, they are usually looking for a solution. If your content feels generic, they will leave in seconds.

    If you are promoting a web marketing course, explain clearly:

    Website traffic analytics dashboard showing performance growth
    • What skills will students actually learn?
    • Will they work on live projects?
    • How will this help them get a job or freelance work?

    Real answers build trust. Fancy writing does not.

    4. Ignoring Website Experience

    Sometimes traffic is not the problem; the website is. If your website is slow, confusing, or not mobile-friendly, people will not stay.

    Common issues:

    • Too many popups
    • No clear contact button
    • Complicated layout
    • Long loading time

    Visitors decide very quickly whether they want to stay or not. A clean and simple website works better than a complicated one.


    5. Not Checking Performance Data

    Digital marketing gives you data for everything, but many people never check it.

    They don’t see:

    • Which pages are performing well?
    • Where users are dropping off
    • Which keywords are bringing traffic?

    Without checking analytics, improvement becomes guesswork. And guesswork rarely brings growth.

    website traffic growth

    6. Being Inconsistent

    Consistency is boring, but it works. Publishing one blog this month and then disappearing for two months does not help. Search engines prefer websites that are active and updated regularly.

    Even small improvements done consistently are better than big efforts done occasionally.

    Why Learning Practical Digital Marketing Matters

    Understanding mistakes is one thing. Avoiding them in real projects is another.

    Many learners read blogs and watch videos but struggle during actual implementation. Practical exposure helps in understanding how SEO, content strategy, and analytics work together.

    That is why structured training programs focus on live projects, keyword research practice, and real website optimization instead of only theory.

    When students practice these skills during a Web Marketing Course, they gain clarity and confidence. And confidence directly reflects in better execution.

    Conclusion

    Website traffic does not grow just because a website exists. It grows when digital marketing is done properly and consistently. Clear strategy, practical SEO, helpful content, and a simple user-friendly website – these are the basics. Without them, traffic struggles.

    If someone truly wants to understand how digital marketing works in real life, not just in theory, learning through practical training makes a big difference. Choosing the right programme, like a well-structured web marketing course or the top digital marketing course in Kanpur, helps in understanding these mistakes before making them. 

  • Digital Marketing Course in Yashoda Nagar, Kanpur – YV Institute

    Digital Marketing Course in Yashoda Nagar, Kanpur – YV Institute

    A Simple and Practical Way to Learn Digital Marketing Students from Yashoda Nagar often look for a digital marketing course in Yashoda Nagar where concepts are explained clearly and learning feels calm, not rushed. They prefer a place where basics are covered properly before moving ahead. YV Institute fits this need well, as classes start from the foundation and progress step by step. Even complete beginners feel comfortable and confident while learning here.

    digital marketing course in yashoda nagar

    How Learning Happens at YV Institute

    At YV Institute, students are not just taught concepts. They are shown how digital work actually happens in real situations. Trainers explain everything with examples, so learning feels natural.

    Students slowly learn:

    • Planning social media posts, reels, and weekly content
    • Writing simple blogs, captions, and brand content
    • Understanding e-commerce product listing and store handling
    • Creating basic WordPress websites on their own
    • Small practice tasks are given regularly so students can apply what they learn.

    Why Yashoda Nagar Students Choose YV Institute

    • Easy explanations that are simple to follow
    • Focus on practice along with learning
    • Friendly trainers who clear doubts patiently
    • Support for internships and portfolio building

    Conclusion

    For students in Yashoda Nagar, YV Institute becomes a comfortable place to start their digital marketing journey. Learning happens at a steady pace, with focus on real skills. By the end of the course, students feel confident working on projects, preparing for jobs, or starting freelancing with practical knowledge.

    To explore the complete digital marketing course structure, detailed modules, and career guidance, you can read the full guide here:
    https://yvinstitute.com/digital-marketing-course-in-kanpur/

  • Digital Marketing Course in Shyam Nagar, Kanpur – YV Institute

    Digital Marketing Course in Shyam Nagar, Kanpur – YV Institute

    Digital Marketing Course Shyam Nagar is designed for beginners who want to learn SEO, social media, content writing, WordPress, and e-commerce basics with practical projects, but don’t know where to start or which institute will teach them in a simple and easy way. YV Institute has become a preferred choice because the classes are easy to follow, the batch environment is friendly, and every topic is taught through small practical tasks instead of heavy theory.

    Even students who have never worked on a laptop before start learning with confidence and gain real skills they can apply immediately .

    digital marketing course shyam nagar


    Where YV Institute participants find out

    • SEO concepts clarified: how to look at a website, identify problems, and understand ranks 
    • Creating weekly posts, reels, story ideas, and basic ad settings are all part of social media planning.
    • Social Media Planning in Digital Marketing Course Shyam Nagar
    • Content writing involves brand-focused writing, microblogs, and subtitles. 
    • E-commerce basics: how to handle listings, manage categories, and submit goods 
    • Setting up a WordPress website to create simple, user-friendly websites 
    • Little daily tasks that help learners understand how real-world situations work


    Why did Shyam Nagar students choose YV Institute?

    • The teaching style is calm and simple, not rushed.
    • Every student gets regular practice, not just notes.
    • Good teachers that go over things regularly are needed.
    • helping with starting projects, internships, and portfolio development
    • Students usually claim that they feel free to ask questions here, which helps their learning. 

    In conclusion

    Students in Shyam Nagar view YV Institute as a location where they can truly learn at their own level instead of as an official classroom. By the end of the course, they understand how SEO works, how to plan social media content, how to write for brands, how to manage e-commerce stores, and how to build websites.

    Most importantly, they leave with enough real confidence to handle their own projects, apply for internships, or even start freelancing.

    “Don’t stop here! Scroll down and read the full blog to master digital marketing → Read Full Blog”


  • YV Institute – Kanpur’s Trusted Digital Marketing Training Hub

    YV Institute – Kanpur’s Trusted Digital Marketing Training Hub

    Digital Marketing Course in Kanpur is becoming a popular choice for students who want practical, job-oriented digital skills. A Location-Based Guide for Students Across the City Digital careers are rising quickly in Kanpur, and students now prefer institutes that focus on practical learning instead of long theory-based classes. Whether someone is from K-Block, Barra, Saket Nagar, Govind Nagar, Baradevi, Shyam Nagar, Ratanlal Nagar or Civil Lines, many students choose YV Institute because the training is simple, hands-on, and job-orientated.

    This guide explains why students from different areas trust YV Institute and how each course helps them build strong career skills.

    1. Digital Marketing Course In Kidwai Nagar

    Students from K-Block usually look for clear teaching and practical exposure. YV Institute offers exactly that: easy-to-follow sessions and weekly tasks that build confidence from day one.

    Popular Courses for K-Block Students:

    • Digital Marketing (Full Programme)
    • Social Media Marketing & Instagram Strategy
    • E-commerce Product Listing
    • Content Writing & Brand Copywriting
    • SEO & Blogging
    • Canva Design Essentials
    • WordPress Website Development

    Why K-Block Students Prefer YV Institute:

    • Easy to reach
    • Friendly, supportive teaching
    • Real work on live projects

    2. Best Digital Marketing Coaching in Barra

    Barra students mostly look for career-focused, skill-based training that prepares them for jobs, freelancing, and internships. YV Institute, a trusted digital marketing institute in Kanpur, offers practical training that helps them grow confidently.

    Most Selected Courses:

    • Social Media Management
    • Performance Marketing (Google Ads + Meta Ads)
    • Basic to Advanced Web Design
    • Marketplace Training (Amazon, Flipkart)
    • Copywriting for Brands

    Why Barra Students Prefer the Institute:

    • Live and practise.
    • Extra freelancing guidance
    • Resume & interview preparation

    3. Digital Marketing Course for Saket Nagar Students

    Students from Saket Nagar usually want a balanced mix of practical training and clear explanations, and YV Institute, a trusted digital marketing institute in Kanpur, matches their expectations perfectly.

    Skills Learnt in This Area:

    • SEO + Google Analytics
    • Social Media Planning & Content Calendar
    • Brand Copywriting
    • WordPress Development
    • Canva Designing
    • E-commerce Management
    Digital Marketing Course in Kanpur at YV Institute

    4. Govind Nagar – Strong Interest in Digital Careers

    Govind Nagar students are now exploring freelancing, social media-based work, and digital marketing course in Kanpur roles, making YV Institute a popular choice.

    Popular Modules:

    • Content Strategy & Copywriting
    • Meta Ads (Facebook & Instagram Ads)
    • E-commerce & Dropshipping Basics
    • SEO & Local SEO
    • Small Business Website Creation

    Most Demanded Courses:

    • Full Digital Marketing Course
    • Social Media Reel Planning
    • Canva Designing
    • Blogging & Copywriting
    • WordPress Website Setup
    • E-commerce Store Setup

    Why They Prefer the Institute:

    • Easy explanations
    • Regular practice
    • Supportive mentors

    6. Ratanlal Nagar & Civil Lines – Flexible Learning Options

    Many learners from these areas are working professionals who need batch flexibility and practical guidance.

    Popular Choices: SEO Mastery

    • Performance Marketing
    • Website Development
    • Content & Copywriting
    • E-commerce Listing & Management

    Why Professionals Choose YV Institute:

    • Flexible timings
    • Practical live campaigns
    • Portfolio-centric training

    7. Digital Marketing Course for Kidwai Nagar Students

    Students from Kidwai Nagar usually want a full digital skillset, and YV Institute, a trusted digital marketing institute in Kanpur, provides a complete programme that covers all major modules.

    Best-Selling Courses:

    • Full-Stack Digital Marketing
    • Social Media + Copywriting
    • Google Ads + Tracking
    • Amazon/E-commerce Listing
    • WordPress Development

    Why YV Institute Stands Out Across Kanpur

    Students from every part of the city appreciate one main thing:

    YV Institute focuses on real work, not bookish study.

    What Makes the Institute Trusted:

    • Practical training with real tools
    • All major digital skills under one roof
    • SEO, social media, e-commerce, Ads , Websites
    • Live projects, content tasks, reels & campaigns
    • Help with internships and placements
    • Freelancing and client-handling guidance
    • Personality development support

    Many students even consider it one of the most reliable digital marketing institutes in India, and a trusted digital marketing institute in Kanpur, based on teaching quality and support.

    Frequently Asked Questions

    1. Does the course cover all major digital modules?

    Yes, SEO, social media, Google Ads, e-commerce, content writing, copywriting and website development are included.

    2. Can beginners join the course?

    Yes. The classes are simple and beginner-friendly.

    3. Are the sessions practical?

    Yes. Most modules include hands-on work and real tasks.

    4. Are social media and e-commerce part of the main course ?

    Yes, both are included in the full programme.

    5. Do students get job assistance?

    Yes. Resume and interview support and career guidance are provided.

    6. Is the institute easy to reach from different areas of Kanpur?

    Yes, the location is easily accessible from all nearby localities.

    Conclusion

    No matter which part of Kanpur a student comes from – K-Block, Barra, Saket Nagar, Govind Nagar, Shyam Nagar, Ratanlal Nagar, Civil Lines or Kidwai Nagar – YV Institute, a trusted digital marketing institute in Kanpur, offers training that focuses on real skills and real practice. Every course is built to make students confident with hands-on work, whether it’s SEO, social media, e-commerce, content, or website development.
    By the end of the programme, students don’t just learn digital marketing; they know how to apply it, build their portfolio and handle real projects. This practical approach is what makes YV Institute one of Kanpur’s most trusted places to start a digital career.